
A handy guide to effectively install a Rootlok retaining structure
Rootlok is our UK-manufactured modular geotextile bag and interlocking plate system designed to provide a sustainable and natural alternative to hard-engineered retaining structures.
This system is suitable for both land and water applications, delivering a green finish that promotes biodiversity and environmental enhancement. The system is highly versatile, used in gravity walls, retaining walls, slope stabilisation, bunds, erosion protection, landscaping, and Sustainable Drainage Systems (SuDS). Rootlok is widely specified throughout the building & construction industry, housing, commercial and environmental markets. Rootlok’s vegetated system helps contribute towards Biodiversity Net Gain (BNG) through biodiversity, enhanced wildlife habitat, greener infrastructure, carbon reduction & sustainability.
IMPORTANT!
Structural Design
The design of any retaining wall requires the input of an engineer to assess the unique conditions present on site in terms of site and soil conditions. This guide is for information only and should not be used without the input of an engineer beforehand. It is the installer’s responsibility to ensure the design and guidelines are executed as closely as possible. It is the engineer’s and owner’s responsibility to ensure that the installation has been executed properly.
Safety Considerations
All filled Rootlok bags weigh approximately 30kg. Handling of bags should be undertaken in accordance with the Manual Handling Regulations 1992. This concludes that there is a high risk of injury to individuals repetitively manually handling units in excess of 20kg. All persons are reminded that a suitable and sufficient assessment of risks must be made of all tasks to be carried out in accordance with the relevant Statutory and Regulatory requirements prior to construction.
Temporary Works
- Temporary works should be considered before commencing the works.
- Temporary works requirements must be assessed by a qualified person and a suitable temporary works design in place prior to excavation if deemed necessary
- Only expose the required lengths of excavations that have been assessed as safe to do so.
- Avoid leaving cut faces exposed for prolonged periods or in extreme weather.
- Temporary excavations are to be checked regularly for stability. Any water egress should be diverted with suitable drainage prior to entering the backfill.
Always consult GeoGrow construction drawings for information specific to solution that is being constructed.
Installation Guidelines
This document is intended for use as a general guideline for the installation of the Rootlok Vegetated Wall System. It provides general guidelines for the construction of gravity, tie-back and geogrid reinforced walls. It is recommended that a site specific design is followed alongside these guidelines.
Excavating and Preparing the Foundation
- Mark/set out the toe of the wall (see Fig 1.)
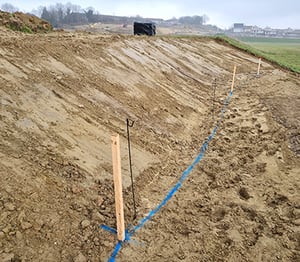 Fig 1. Setting out the toe of wall.
- Prepare the back slope of the excavation to a safe angle ensuring suitable space from the toe can be achieved as per the design.
- Excavate the foundation to the required depth and extents. (Allow space at the toe of the wall to place the bags flush with the string line - this may require the foundation to be excavated further forward than the marked out line, especially in walls which have a toe of stone protruding in the foundation.)
- Where the wall has multiple foundation steps, begin excavations at the lowest point if possible. Build up and out in layers. (see Fig 2.)
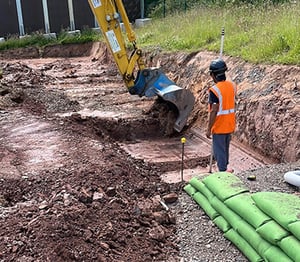 Fig 2. Excavating multiple steps.
- Inspect the foundation to confirm design assumptions represent the ground conditions. (If ground conditions or environmental factors vary significantly from the design, contact GeoGrow as a design review may be required.)
- Test to confirm bearing capacity of foundation material if required. This can be done with a Hand Shear Vane (if suitable cohesive “clay” material)/Plate Bearing Test or another approved testing method.
- Ensure foundation is free of standing and running water, any water egress should be taken via suitable outlets away from the foundation.
- Place engineered fill as per the design requirements to form the foundation at the required thickness (usually 150mm). Verify this with an engineer or a laser level set to the correct depth. The fill will need to be laid slightly proud to allow for loss of height during compaction (see Fig 3).
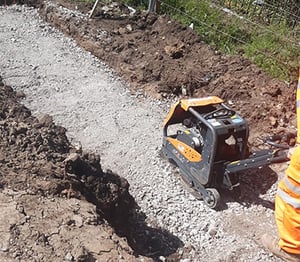 Fig 3. Compacting the foundation
- Compact the material using a suitable compaction plant and ensure >95% compaction is reached.
- Re-measure the level and add or remove fill until a consistent and flat surface is achieved.
- If necessary, re-mark out the toe of the wall after the foundation has been constructed
Rootlok build types
A full view of our build types can be found here
Rootlok systems can be laid in two formations - gravity or tie-back. The type of lay is detailed on the drawings provided for each specific drawing or as specified by an engineer.
Gravity Build
For gravity builds all layers should be laid end-to-end with no bags returned back into the system. This type of solution is typically used for low height walls or when geogrid with wraparound is used (see Fig 4).

Tie-Back Build
For tie-back builds, the first row of bags are placed in a tie back formation, alternating the bags between horizontal and 90° perpendicular (see Fig 5). The next layer of bags is laid end-toend and then the tie-back pattern is repeated on the next row, alternating between tie back and end-to-end rows until the build is completed.

 Table 1. Bag Offset Distances
Constructing the wall
- When laying bags shake them before laying to break up the contents and reset to original shape.
- Place the first row of interlocking plates along the central line of where the bags will be laid, spacing them out to ensure one plate is laid below each bag (see Fig 6).
 Fig 6. Laying the first row of interlocking plates.
- Check design for any geogrid required, if so place geogrid to required length (see section regarding geogrid installation.)
- Lay first row of bags either as tie back or gravity method as shown in the design ensuring the stitching seam should be laid on the backfill side of the wall (see Fig 7).
 Fig 7. Laying first row of bags and second row of interlocking plates. Always lay the bags with the back seam facing towards the rear of the wall.
- Using a string line, check the first layer of bags is straight or follows the required shape of the wall.
- Place backfill material behind the laid bags and fill to a thickness roughly 0-10mm above the top of the recently laid bags to allow the fill to be level with the top of the bags after compaction (see Fig 8).
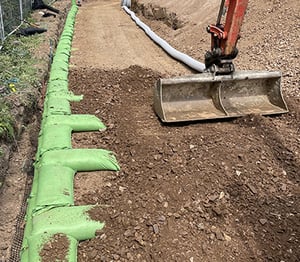 Fig 8. Placing the backfill material.
- Compact in accordance with the design. No heavy compaction plant to be used within 1.5m of the front face. Bags to be compacted with a light whacker plate to create level rows (300mm max base plate)
- The Rootlok plates for the next layer can now be laid on top of the previous layer. One plate can be used to span each joint between the bags on the last layer (see Fig 7). Plates should be placed with the 8 spikes facing down.
- Lay the next layer of bags end-to-end and then repeat the pattern, (alternating between tie back and end-to-end with each row for tie-back builds).
- Ensure the bags on adjacent layers are vertically offset so bag joints don’t coincide on consecutive layers, and keep the midpoint of the bag as close above and below as possible, similar to a brick wall.
- Bags on subsequent layers need to be offset from the one below to maintain a staggered slope angle. (See offset calculator in Table 1). Place the bag at the specified distance away from the front of the bag below, bringing it closer to the rear of the wall. The wall slope should be assessed every 500mm gain in height with an electronic protractor/inclinometer to confirm that the wall slope is on target. Significant deviations <+2° from the target slope angle may require sections of wall to be rebuilt.
- If applicable, install drainage as per the design (see Fig 9).
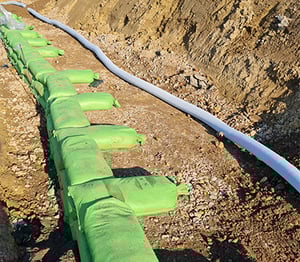 Fig 9. Laying drainage pipe.
- Lay the next layer of bags and repeat these steps up to the required height.
If geogrid is specified in the drawing, see our geogrid reinforcement article here.
Fence Post Sleeves
If required, fencing can be installed at the top of the Rootlok wall by installing post sleeves into the backfill of the wall during construction. Fence posts should be concreted into the sleeves later.
- Consult a fencing designer to determine the fencing design, size of post sleeves and the distance between fence posts.
- Fence sleeves should be installed at a depth which allows the top of the sleeve to be flush with the wall top. Ensure sleeves are straight during wall construction using a spirit level.
- Fence post sleeves should be inset from the face of the wall by a sufficient distance to avoid fouling the bags during construction of subsequent layers (see Fig 14).
 Fig 14. Placement and backfilling of post sleeves.
- A minimum offset of 300mm should be maintained between the front of the bags and the back of the post sleeve to ensure adequate compaction of fill around the sleeve (see Fig 15).
 Fig 15. Compacting the backfill.
Finishing and Maintenance
Where pre-seeded bags are used within the wall build minimal maintenance is required. Alternatively it is recommended that the wall is hydroseeded as soon as possible after completion.
After hydroseeding / post construction if pre-seeded bags are used, ensure bags are kept damp to promote germination and vegetation establishment, especially during dry weather. Achieve this using irrigation or indirect watering. Ensure that watering is kept to a very low pressure to avoid dislodging newly-sown seeds.
Follow design specific maintenance guide for more information.
 Fig 16. Watering the wall.
To learn more about our Rootlok systems please contact us to learn more
01543 224800
sales@geogrow.com